How to connect Shopify forms to highLevel - (2 Methods tutorial)
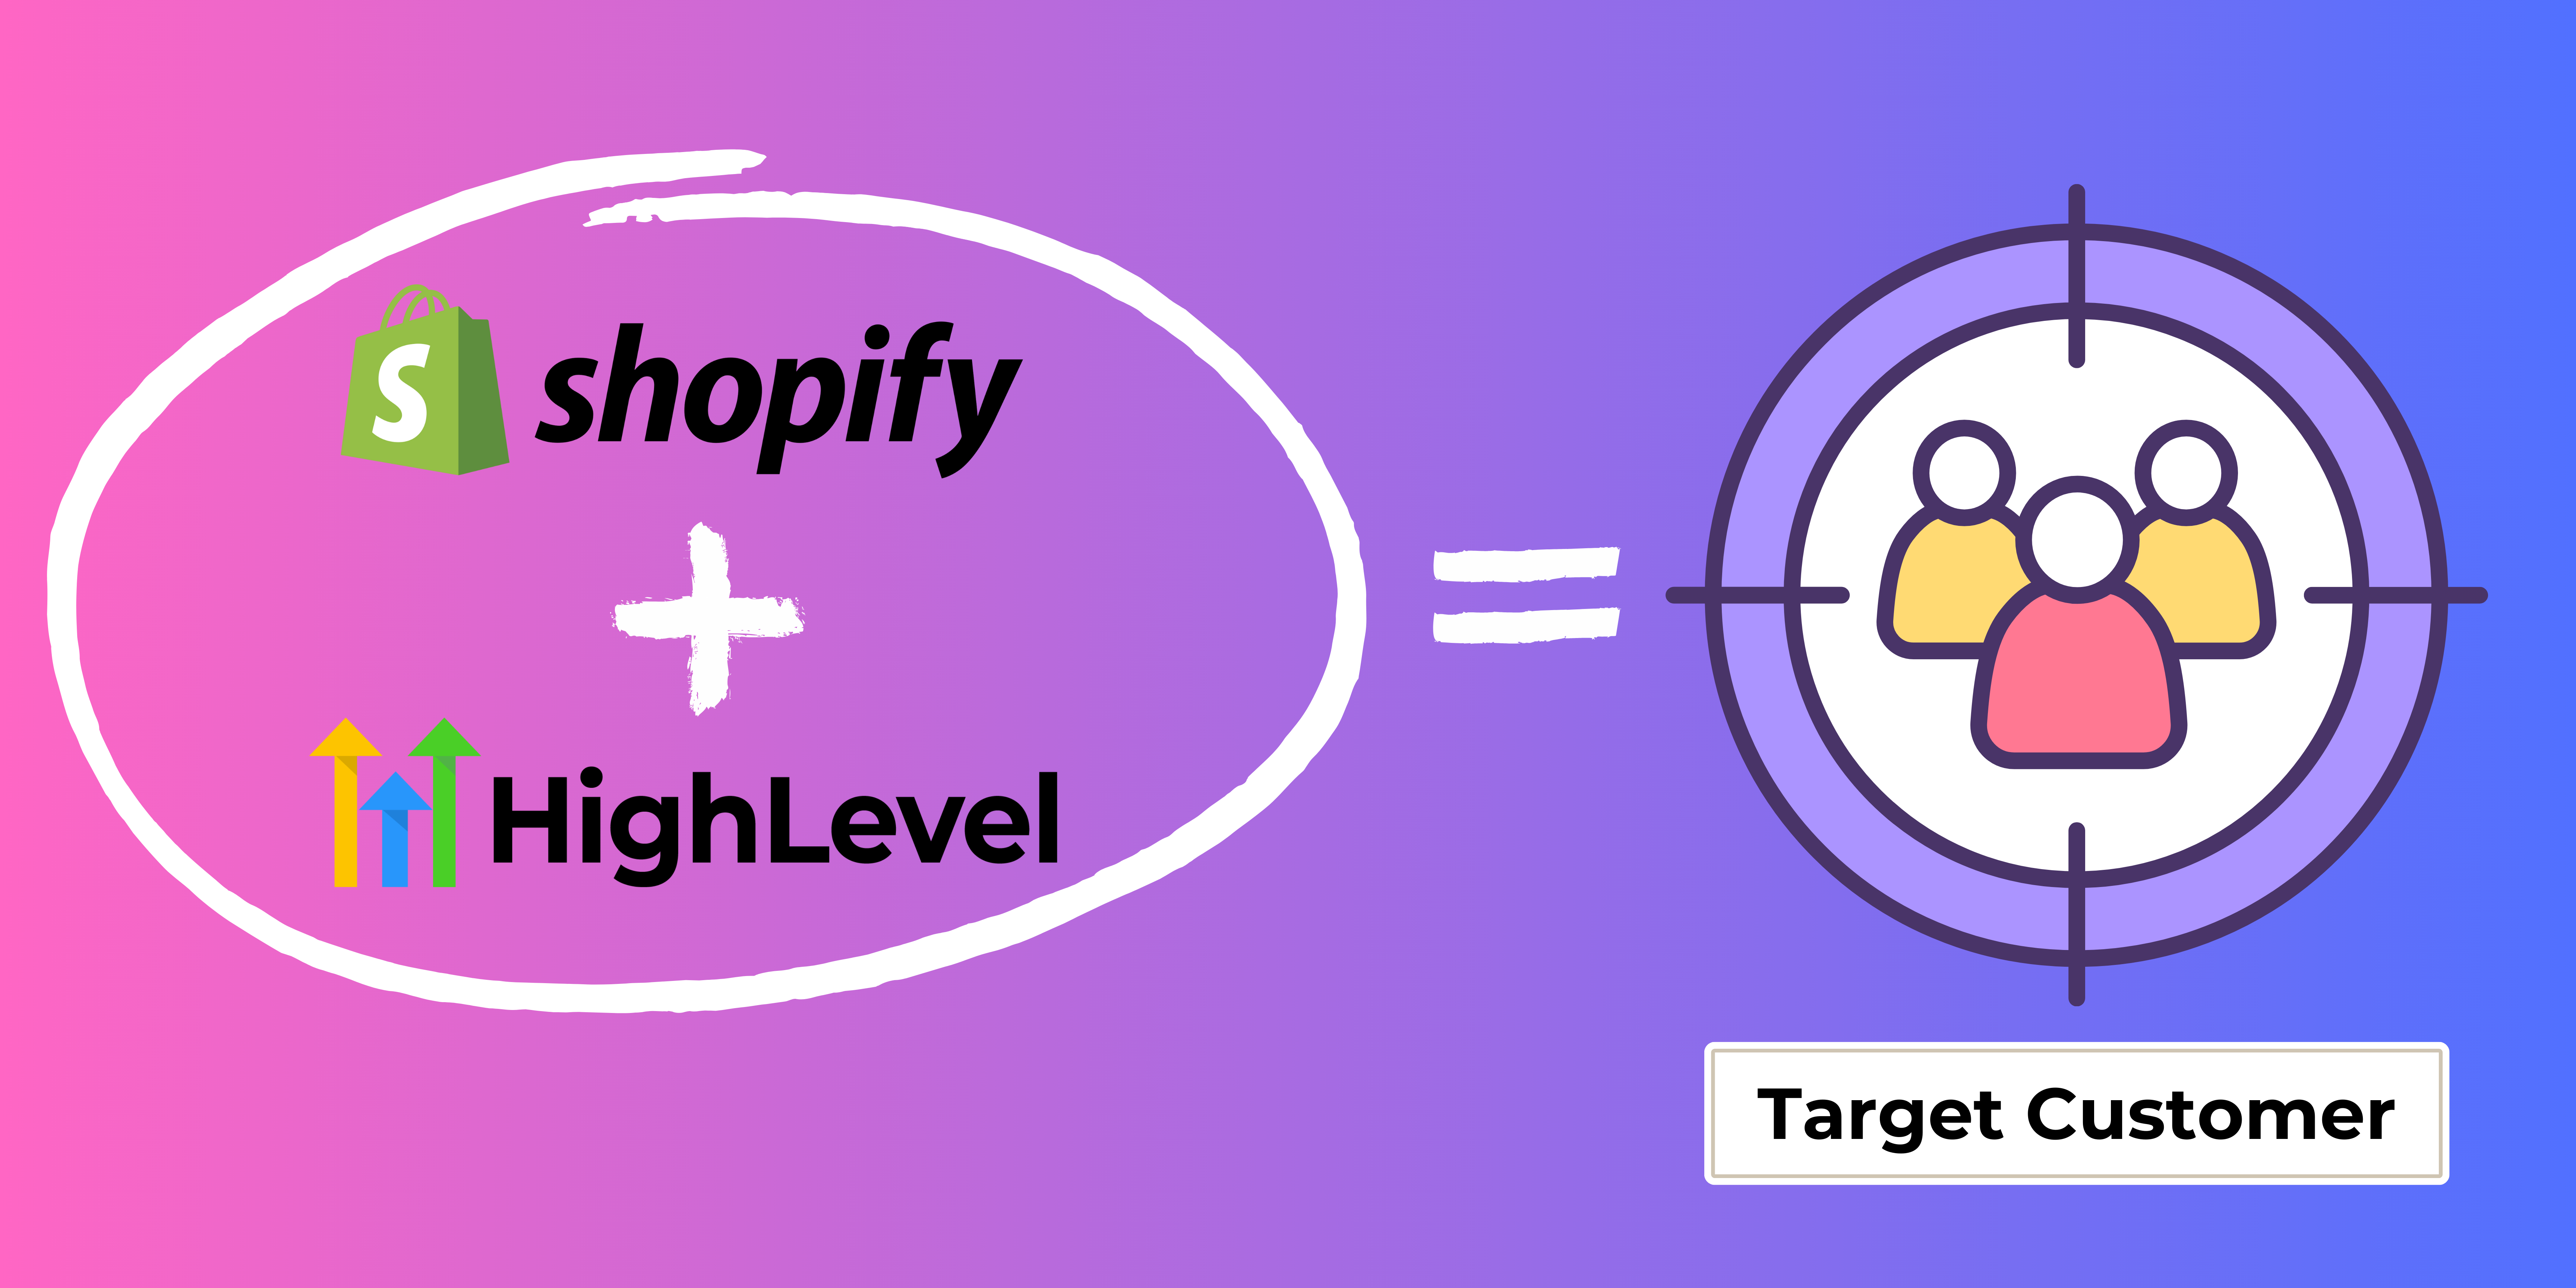
The purpose of connecting Shopify and HighLevel is to generate more lead capture through Shopify . HighLevel is a CRM (customer relationship management). With the help of HighLevel , we can get a customer list with their data in “HighLevel” dashboard.
HighLevel CRM allows us to fetch customer data when they engage and submit forms with our Shopify website. With this data, we can email back our customers to give them follow-up and convert our leads into customers. there are two ways to connect Shopify form to HighLevel . One is connecting through third-party service Another is manually connecting Shopify to HighLevel directly.
Today we will see both cases Automatically and Manually. Automatic connection is a very easy method that’s why I explained the automatic option first. if you are looking for manual webhooks interaction then you can skip the automation part and scroll down or click here for the manual webhooks part tutorial.
Connect Shopify forms to HighLevel using third-party Service
Connecting with the high level is sometimes tricky because we have to combine it with API codes. Everyone is not a coder . so today, we will see how we can connect Shopify and HighLevel without writing a single line of code.
With the help of MAKE, we can easily connect Shopify forms to HighLevel in a matter of a few minutes. Make is a platform that allows us to connect Shopify forms to HighLevel , using their dashboard in just a few clicks. Let’s see how we can connect Shopify forms to HighLevel .
We can connect Shopify form to HighLevel just following 4 Steps :
- Create a Scenario to add Shopify
- Add HighLevel app
- Add filter
- Schedule and save the scenario
If you haven’t created a Make Account. Click Here to create

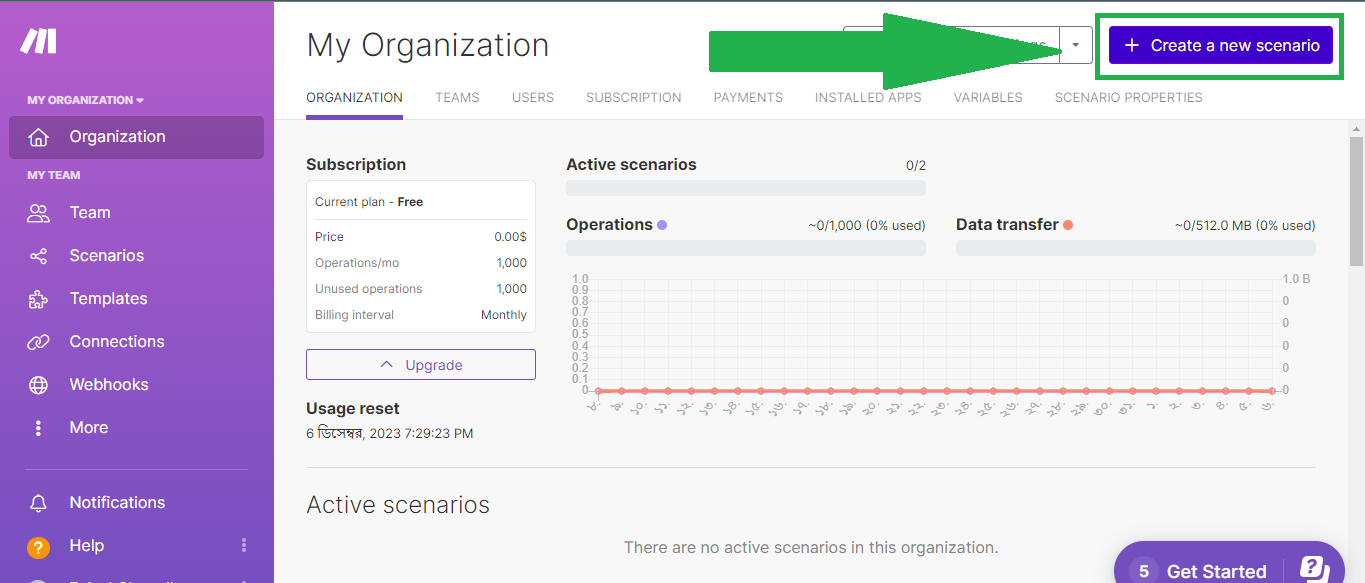
Step 1 : Create a new scenario to add the Shopify
Login to your Make Dashboard. In the upper-right corner you will see “Create a new scenario” . click on that .
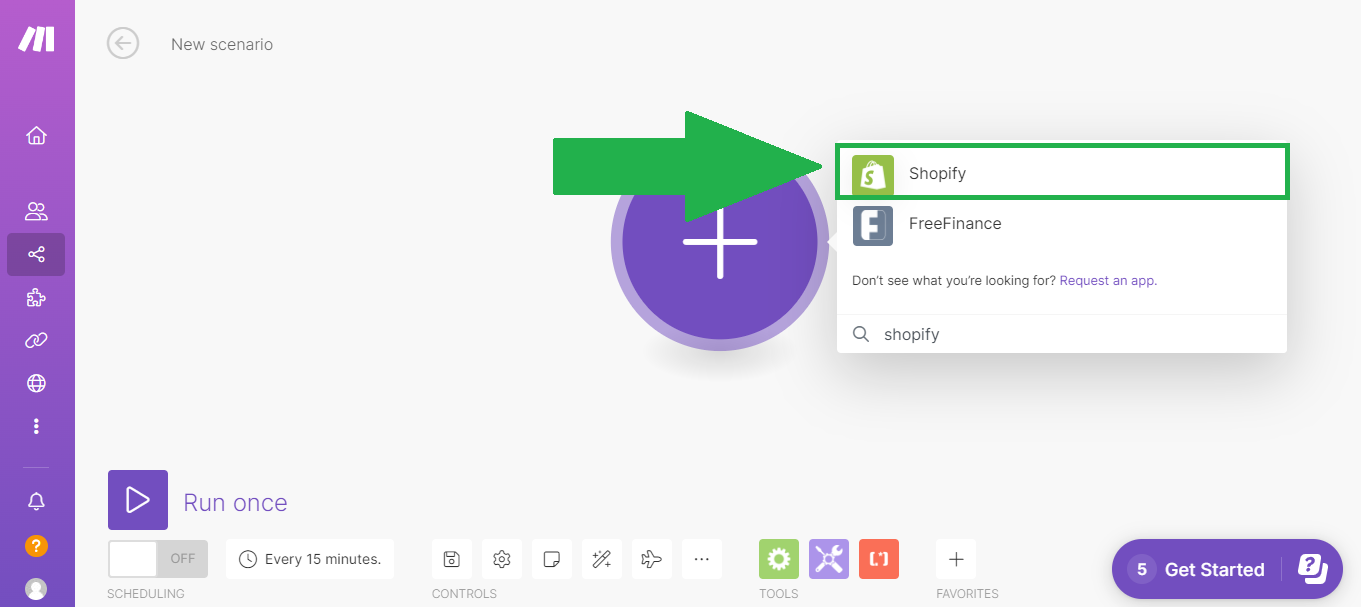
Click the add Icon and search for the “Shopify”
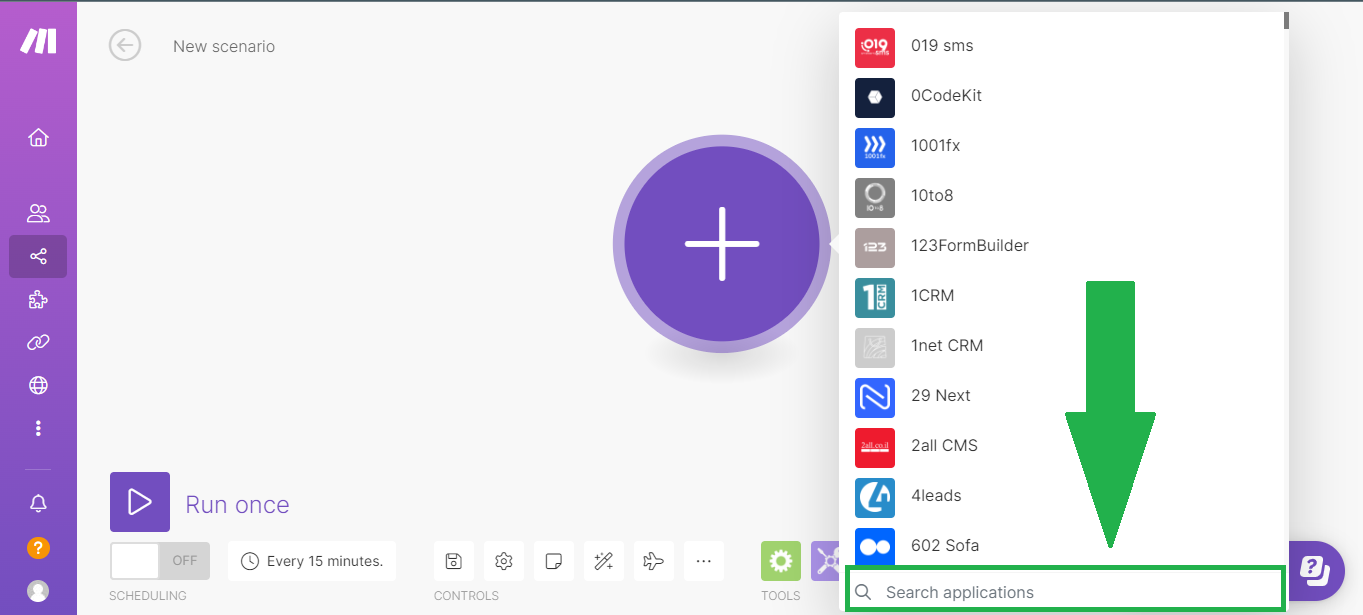
Select “Shopify” from search result
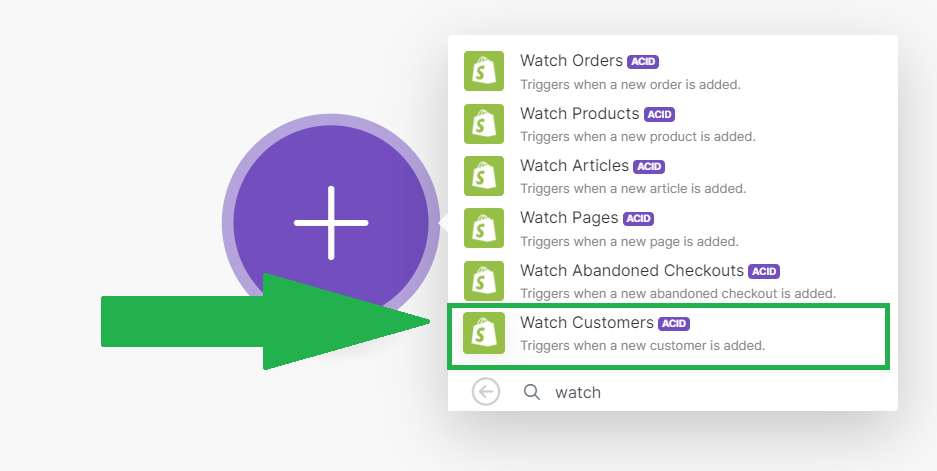
Since you want to trigger when you have new sign-ups added as new customers or submit contact form ,Search “Watch Customers” .
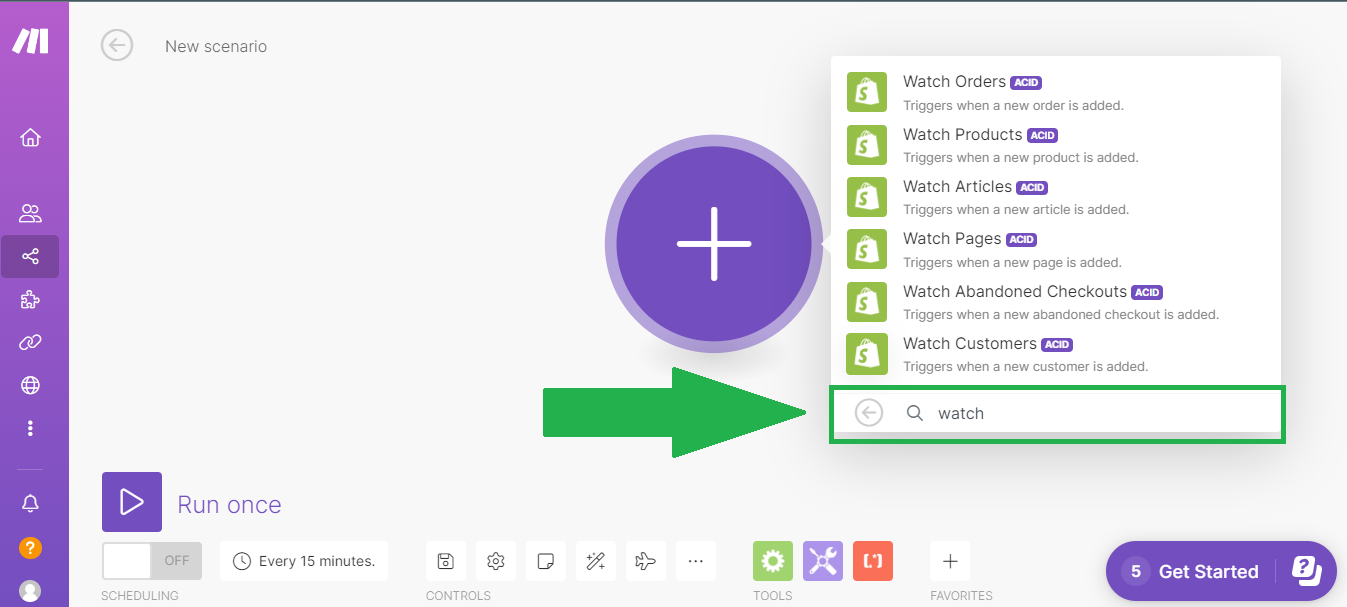
Select the “Watch Customers” module.
Now ready to configure the Shopify module.
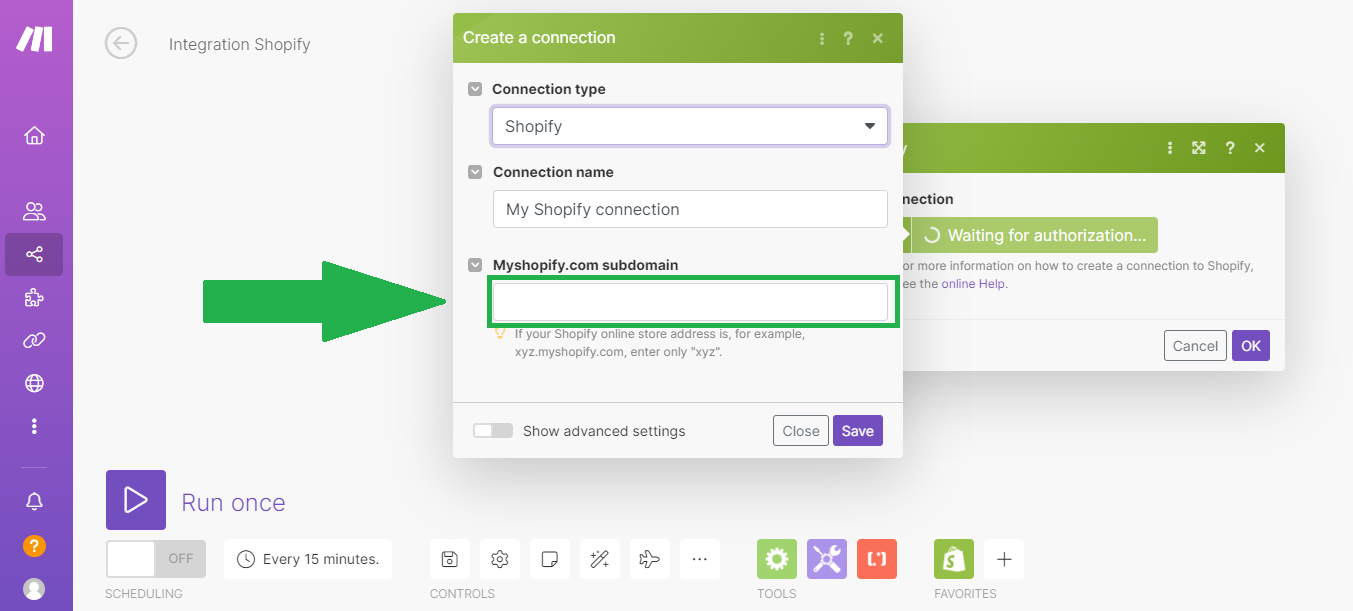
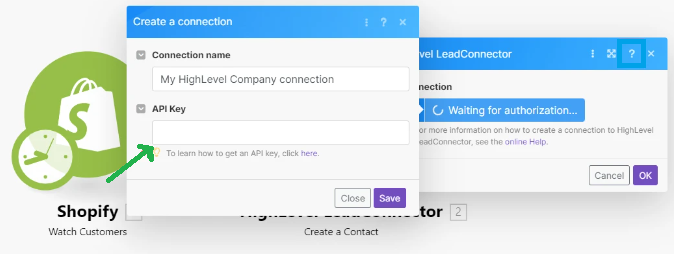
Click Add and select Shopify as the Connection type to connect your Shopify account to Make account first.
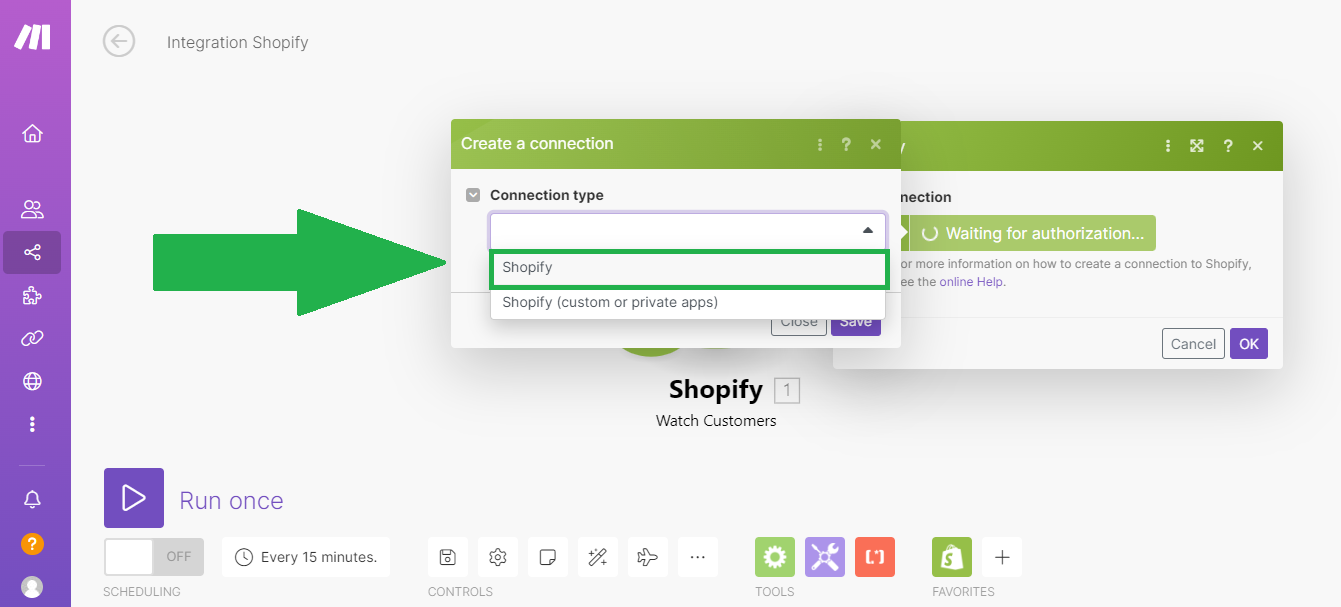
In the next window, set a connection name and enter your Shopify subdomain (name of your Shopify store).
If your shopify online store is , for example, “xyz.myshopify.com” enter only “xyz” .
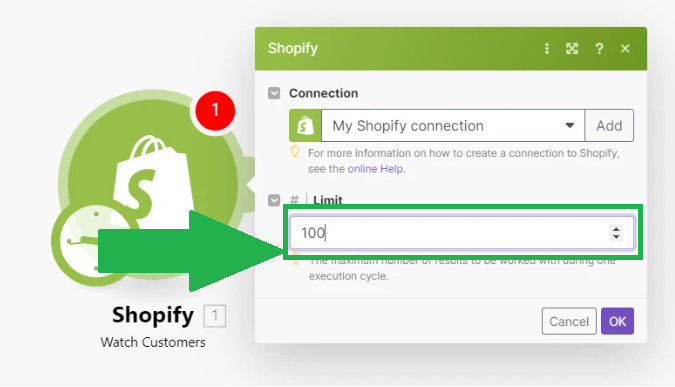
Once your account is connected, you can enter the Limit, which is the maximum amount of customers you want Make to retrieve during a single execution of the scenario.
For example, if you usually receive 20 form submissions a day and schedule the scenario to run once a day, the Limit should be set to a number higher than number 20.
After setting the Limit, click OK button and you will see another window pop up, asking you where you would like to start processing from (Choose where to start ).
If you select From now on, option only customers who sign up from this point onward will be retrieved when the scenario is executed.
If you select All, it will retrieve all your current customers in the next execution. You can also select customers from a certain date or start with a specific customer.

After deciding when to start, click OK button and move on to the next step.
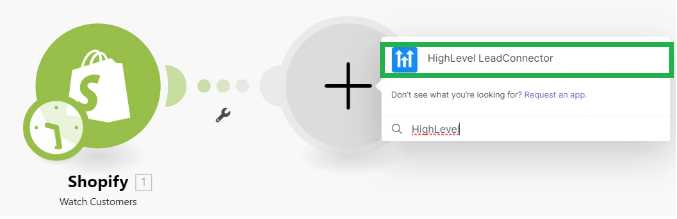
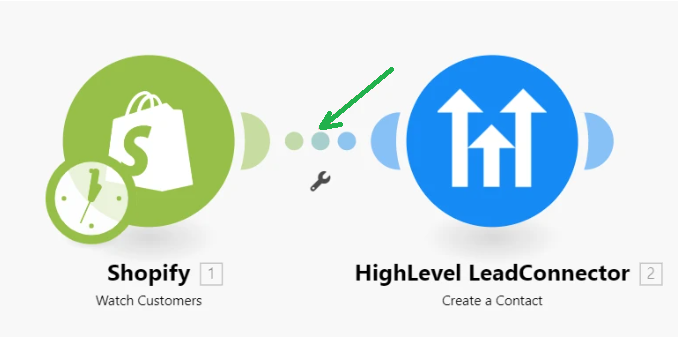
Now, add the HighLevel app to the scenario. To do this, click the plus sign next to the Shopify module when hovering over it.

Here, search for HighLevel.
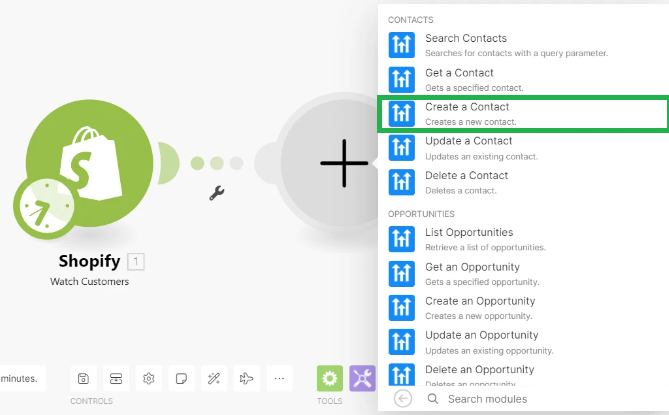
Since we want to send customers over to HighLevel (for retargeting, loyalty programs, newsletters, etc.) select the HighLevel > Create a Contact module.
Now Connect your HighLevel account to Make Account.
To proceed, you will require your HighLevel API key. navigate to your HighLevel dashboard > Select Settings > Click on API Key > A full list of your API keys will be there.
if you haven’t created HighLevel account. click to create an account
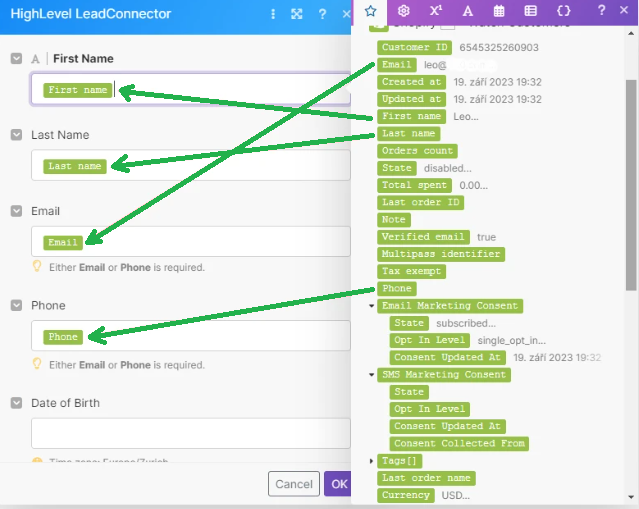
Once HighLevel is connected to Make, simply map (drag and drop) the matching data items from the Shopify module to the HighLevel module fields.
Scroll down the module to see all the available fields that you can map, First Name item to the First Name field.
At this point, all new customers will be sent over to HighLevel, whether they were acquired through the signup form.
However, we only intend to send customers who have signed up to HighLevel, and this requires us to filter those customer records.
We can use a Filter in Make for this
Step 3 : Add filter
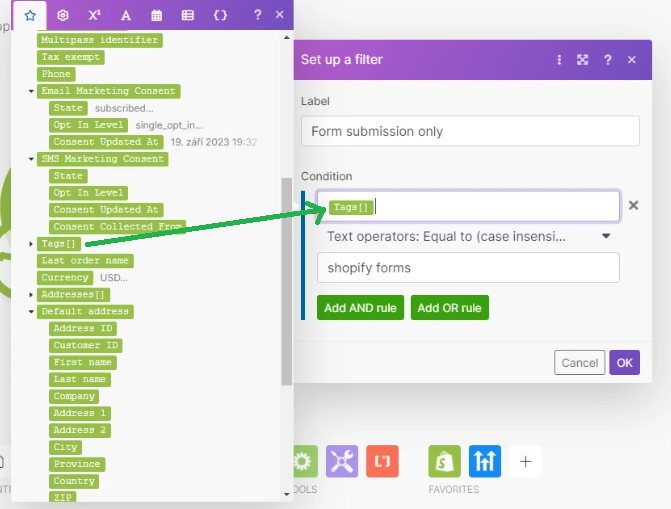
You will may notice a link between the two modules – if you click on it, you will open the filter configuration window.
Let’s start by naming the filter, which is a recommended practice when constructing scenarios.
Customers who sign up are automatically tagged with the form’s name, so we will utilize this tagging to filter the customer records.
To do that, map the Tags[] data item to the top field.
Next, choose the “Equals to” (case-sensitive) text operator and enter the form’s name in the bottom field.
That’s all you need to do to configure the filter!
Step 4: Schedule and save the scenario
The final step is to decide how often you want the scenario to happen, like every 15 minutes, once a day, or once a week.
Notice the clock icon on the Shopify module? Open the scheduling settings by clicking on it.
Choose a schedule that makes sense to you and click OK to set it up.
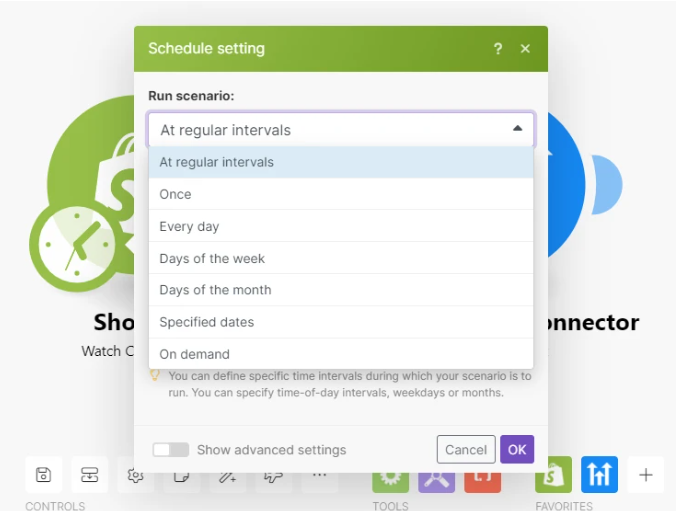
Save your scenario, turn it on, and let Make handle this task automatically once and for all.

Summary : It is now easier than ever to connect shopify forms to highlevel
Making the connection between Shopify Forms and HighLevel will be a significant step toward the goals of improved customer interaction and higher sales conversion rates.
It’s time to move away from the outdated manual data entry process that costs your business money in terms of time and resources. This integration is key to focusing on real-time, data-informed actions that truly matter.
If you followed this tutorial, you probably noticed that we didn’t need to write any code to set up this integration.It only required a few easy steps.
connecting apps with Make is not only easy but also very budget-friendly because you don’t require a highly technical expert or you don’t need to hire any professional .
Connect Shopify forms to HighLevel Manually Using Webhooks
Now its time to see how we can connect Shopify to HighLevel without using any Third-party service .
Connecting Shopify forms to HighLevel typically refers to the process of linking the forms on your Shopify website with your HighLevel CRM (customer relationship management) system.
With the help of the integration, data and leads created through Shopify forms are able to be easily transferred to your HighLevel account dashboard, where you can maintain your customer data easily. but we need some technical knowledge to connect Shopify forms to HighLevel manually. We have to follow a few steps to connect Shopify forms to high-level This task is a little bit tricky. If you are not a coder or developer, don’t worry; I showed in this article a step-by-step guide.
We will need an active high-level account to configure it. if you don't have a high-level account. Click to create a high-level account.
Step 1
Prepare the Shopify form in your Shopify account.
Before you can connect your Shopify forms to HighLevel, you need to have forms set up on your Shopify website. These forms can be used for lead generation, contact us, newsletter sign-ups, or any other data collection purposes.
Step 2
Create a high-level webhook.
A webhook is a way to transfer data from one application to another. In our case, we are transferring Shopify form data to our high-level account. We will set up a webhook in HighLevel to receive data from Shopify forms. let’s see how we can do that:
1. Log in to your HighLevel account.
2. In your HighLevel dashboard, click on “Settings” or “Integrations,” or look for a specific option for webhooks.
3. Create a new webhook by following these rules:
Endpoint URL: This is the URL where Shopify will send the form data. HighLevel will provide this URL for you to copy.
Authentication (if needed): Configure any required authentication, such as API keys or tokens.
Save the webhook settings and copy the endpoint URL.
Step 3
Configure the Shopify Form
Now you will need to configure your Shopify form to send data through the high-level webhook. The exact steps may depend on the form builder you are using on the Shopify website. Here are the general steps:
1. Access your Shopify admin panel.
2. Open the form builder or settings for the specific form you want to connect with HighLevel.
3. Look for an integration or webhook section in your Shopify website form settings. You may need to use a Shopify app or add custom code for this integration.
4. We created a HighLevel webhook URL in Step 3. Copy and enter the URL.
5. Make sure the form fields in Shopify match the fields we have set up in HighLevel. This makes sure that the data is correctly mapped.
6. To confirm that data is transferred to HighLevel, test the connection. submit test data from your Shopify form.
Variables
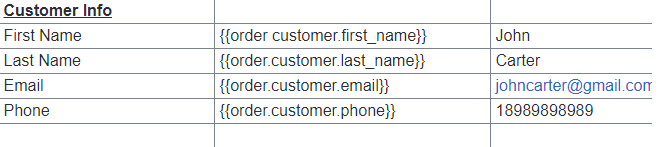
Example :
<form id=”yourFormId” action=”https://your-gohighlevel-endpoint-url.com” method=”post”>
<input type=”text” name=”customer_name” value=”{{ order.customer.first_name }}”>
<input type=”email” name=”customer_email” value=”{{ order.customer.email }}”>
<input type=”tel” name=”customer_phone” value=”{{ order.customer.phone }}”>
<button type=”submit”>Submit</button>
</form>
Important
- Make sure to replace
"https://your-gohighlevel-endpoint-url.com"with the actual endpoint URL provided by GoHighLevel where you want to send the form data. - You can also add additional fields or customize the form according to your requirements.
Step 4
Automation (Optional)
You may want to set up automation in HighLevel to start doing particular things when data provided by the Shopify form is received, depending on how your workflow is set up. For example, you can configure HighLevel to generate a new lead or automatically respond to emails upon form submission.Step 5
Automation (Optional)
Monitor the integration on a regular basis to ensure that data is flowing correctly. If you make changes to your forms or the Shopify setup, make sure to update the integration settings.